静的サイトジェネレータ「Hugo」インストール
静的ジェネレータ「Hugo」のインストール方法を紹介します。
公式のチュートリアルは、こちらです。 Install Hugo
Hugoインストール
Macでのインストール方法
パッケージ管理にHomebrewを使われている方は、下記コマンドを叩けばインストールされます。
$ brew install hugo念のため、brew install hugoの前に、 brew updateで更新しておくと良いです。
Windowsでのインストール方法
パッケージ管理に Chocolatey を使われている方は、下記コマンドを叩けばインストールできます。
$ choco install hugo -confirmバイナリ(実行ファイル)をダウンロードしてインストール
パッケージ管理マネージャー(HomebrewやChocolatey)を利用していない場合でも、以下の通りバイナリファイル(実行ファイル)をダウンロードして、適切なパスを通すことで利用できます。
下記URLに従い、利用するWindows環境に合わせて32bit or 64bitをどちらをダウンロードします。(2018/01/27時点の最新バージョンは0.34)
Windowsの場合
Macの場合
Hugoでのサイト構築
まずは、下記コマンドを実行すると、Hugoを利用する上で必要なフォルダ構成が作成されます。
$ hugo new site {site name} #site nameに指定した名前のフォルダが作成される$ hugo new site myblog.com
Congratulations! Your new Hugo site is created in /Users/meganii/tmp/myblog.com.
Just a few more steps and you're ready to go:
1. Download a theme into the same-named folder.
Choose a theme from https://themes.gohugo.io/, or
create your own with the "hugo new theme <THEMENAME>" command.
2. Perhaps you want to add some content. You can add single files
with "hugo new <SECTIONNAME>/<FILENAME>.<FORMAT>".
3. Start the built-in live server via "hugo server".
Visit https://gohugo.io/ for quickstart guide and full documentation.$ tree
.
├── archetypes
│ └── default.md
├── config.toml
├── content
├── data
├── layouts
├── static
└── themeshugo serverとコマンドを実行すれば、直下のconfig.tomlを読み込んでサイトのプレビューができるのですが、この最低限のフォルダ構成ではなにも表示されないので、まずはテーマをインストールします。
テーマのインストール
Hugoのテーマ
$ cd themes
$ git clone https://github.com/dim0627/hugo_theme_robust.git
プレビュー
ダウンロードしたthemeを利用するには、以下の通り--themeオプションで、インストールしたテーマを指定してhugo serverを実行します。
先ほどテーマをインストールした時に、themesフォルダに移動しているので、サイト直下に戻っています。
cd ..
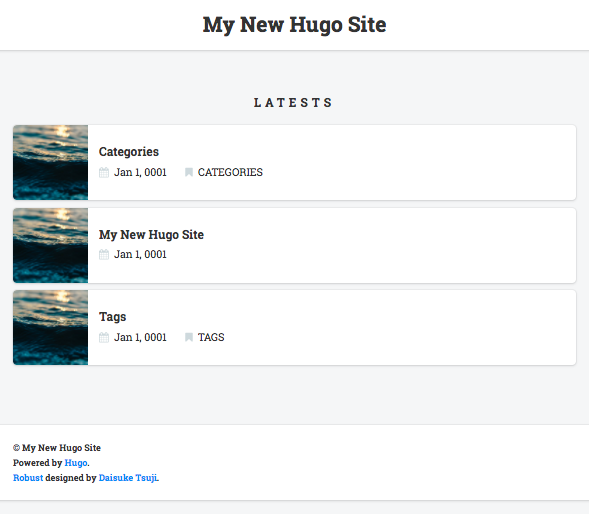
hugo server --theme=hugo_theme_robust表示されました!!

Backlinks
静的サイトジェネレータHugo
Hugo入門 静的サイトジェネレータ「Hugo」でシンプルブログサイトを構築する 静的サイトジェネレータ「Hugo」インストール 静的サイトジェネレータ「Hugo」〜公開方法〜 サイト構築 Hugoのテーマでsubmoduleを使う方法 HugoでのシンタックスハイライトにPython Pygmentsが不要となった HugoのRelated Contentを利用して関連記事を表示する gulpで画像の最適化 Hugoソースコードリーディング〜Taxonomy〜 Render Hooks for Code Blocksを利用してコードブロックにファイル名を表示する Hugoでブログカードを作成する(resources.GetRemote利用) Templates 【Hugo】Partial Templateでは複数returnを記述する早期Returnを使えない 【Hugo】images.TextでOGP画像を生成する Shortcodes Hugo Shortcodesの作り方 HugoのShortcodesを利用してAmazon紹介リンクタグを作成 HugoでAMP対応のブログカードを作る AMP対応 AMP向けのミニマルCSSフレームワーク「1BX」をHugoに導入した AMPページの最適化〜ぼくのAMPサイトがこんなに遅い訳がない〜 AMP OptimizerによるAMPのさらなる最適化 AMP Service WorkerでPrefetch Linksを実現する Data Driven Content Hugoで人気記事を表示するためJSONを返すAPIサーバを作りData-driven Contentを試してみた Tailwind CSS HugoでTailwindCSSを利用しAMP Validなページを生成する ビルド npm-run-allでローカルAPI serverとHugo serverを同時に実行する GitHub Actionsのスケジューラ実行を利用して定期的にビルドする Circle CIでHugoのビルド・デプロイを実行する コンテンツ作成 Git pre-commitフックでFrontmatterの「更新日時」を自動更新する Hugoでブログ記事一覧ページ(ブログアーカイブページ)を作成する 移行 はてなダイアリーからはてなブログ経由で独自ドメインのブログに記事を移行しました JekyllからHugoへの移行ポイント Hugoで生成した静的サイトのホスト先をさくらVPSからNetlifyに変更する 書籍
2017-12-31
静的サイトジェネレータ「Hugo」でシンプルブログサイトを構築する
今、自分でブログ・サイトを構築するとしたら、どんな選択肢があるでしょうか。
さすがにHTMLを自分で手打ちするのは大変です。 なんらかのCMS(Content Management System:コンテンツ管理システム)を利用することになりますが、そのCMSにもさまざまな種類があり、どれを選んだらよいのでしょうか。
私自身、CMSとしては Lokka (Ruby), WordPress (PHP), Jekyll (Ruby), Octopress (Ruby)、 Middleman (Ruby)と利用してきました。
どのCMSも一長一短ですが、Ruby, PHPなどの動的スクリプトで構成されるCMSは共通してビルドの遅さを感じます。
そこで、ビルドが高速という噂の Hugo (Golang)に移行したところ、快適でシンプルなブログサイトを構築できましたので、今回はその Hugo の紹介をします。
2017-01-08