Vagrant上のCentOS6.4にOracle Database Express Edition11gをインストールする
学習用として、ローカルにOracleが欲しかったので、無償版のExpress EditionをVagrantで作成したCentOSにインストールした。
Vagrantで作成したCentOS6.4にOracle XEをインストールする流れは、以下のとおり。
- Vagrantの設定(ホスト側作業)
- Oracle Database Express Edition 11gのダウンロード(ホスト側作業)
- Oracleインストールに必要なパッケージのインストール(ゲストOS側作業)
- Oracleインストール(ゲストOS側作業)
前提
- VirtualBox version 4.3.14
- Vagrant 1.6.3
- Oracle Database Express Edition 11g R2
- ホストOS: Mac OS X Mavericks
- ゲストOS: CentOS 6.4 x86_64 Minimal(20140116) Release CentOS 6.4 x86_64 Minimal (2014-01-16) · 2creatives/vagrant-centos
1. Vagrantの設定(ホスト側作業)
Vagrantの追加
Vagrantのインストール、Virtualboxのインストールについては、割愛する。
ネットワークの設定
Vagrantfileに、利用したいIPアドレスを記載する。
# Vagrantfile API/syntax version. Don't touch unless you know what you're doing!
VAGRANTFILE_API_VERSION = "2"
Vagrant.configure(VAGRANTFILE_API_VERSION) do |config|
config.vm.box = "centos64-x86_64-20140116"
# using a specific IP.
config.vm.network "private_network", ip: "192.168.33.10"
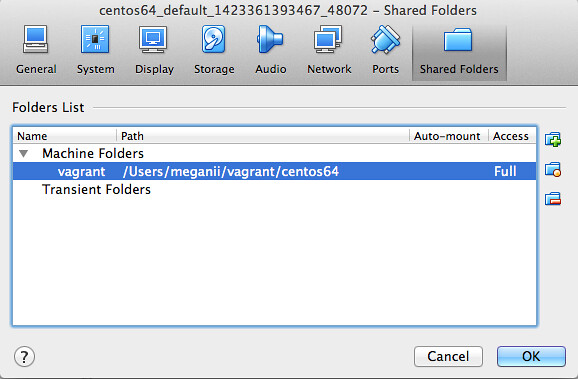
end共有フォルダ設定
CentOS側からみれる共有フォルダを用意する。
CentOSを立ち上げる
vagrant up2. Oracle Database Express Edition 11gのダウンロード(ホスト側作業)
下記のリンクからExpress Editionをダウンロードする。 (要オラクルアカウント。登録は無料です)
ダウンロードが完了したら、共有フォルダに格納しておく。
- Oracleインストールに必要なパッケージのインストール(ゲストOS側作業)
公式ドキュメント を見てみると、必要なパッケージは以下のものとなっている。
- glibc should be greater than or equal to 2.3.4-2.41
- make should be greater than or equal to 3.80
- binutils should be greater than or equal to 2.16.91.0.5
- gcc should be greater than or equal to 4.1.2
- libaio should be greater than or equal to 0.3.104
libaio, bcのインストール
今回は、yumでlibaioとbcをインストールでOracle XEのインストール要件は満たされた。
yum install libaio bchostsファイルにコンピュータ名を追加
vi /etc/hosts- 127.0.0.1 localhost localhost.localdomain localhost4 localhost4.localdomain4
+ 127.0.0.1 localhost localhost.localdomain localhost4 localhost4.localdomain4 vagrant-centos64.vagrantup.com
::1 localhost localhost.localdomain localhost6 localhost6.localdomain6
コンピュータ名は、hostnameで得ることができる。
4. Oracleインストール
rpmによるインストール
rpm -ivh oracle-xe-11.2.0-1.0.x86_64.rpm$ rpm -ivh oracle-xe-11.2.0-1.0.x86_64.rpm
Preparing... ########################################### [100%]
1:oracle-xe ########################################### [100%]
Executing post-install steps...
You must run '/etc/init.d/oracle-xe configure' as the root user to configure the database.構築
以下のコマンドを叩いて、databaseを構築する。
/etc/init.d/oracle-xe configureOracle Database 11g Express Edition Configuration
-------------------------------------------------
This will configure on-boot properties of Oracle Database 11g Express
Edition. The following questions will determine whether the database should
be starting upon system boot, the ports it will use, and the passwords that
will be used for database accounts. Press <Enter> to accept the defaults.
Ctrl-C will abort.
Specify the HTTP port that will be used for Oracle Application Express [8080]:
Specify a port that will be used for the database listener [1521]:
Specify a password to be used for database accounts. Note that the same
password will be used for SYS and SYSTEM. Oracle recommends the use of
different passwords for each database account. This can be done after
initial configuration:
Confirm the password:
Do you want Oracle Database 11g Express Edition to be started on boot (y/n) [y]:y
Starting Oracle Net Listener...Done
Configuring database...Done
Starting Oracle Database 11g Express Edition instance...Done
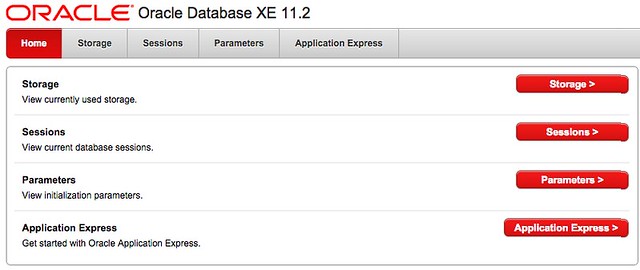
Installation completed successfully.稼働確認
iptablesを一時的に無効にして、http://192.168.33.10:8080 にアクセスした。 (IPアドレス192.168.33.10の部分は、Vagrantfileに記載のもの)
ユーザ名とパスワードは下記の通り。
- ユーザ名: system
- パスワード: インストール時に設定したもの
以下のページが表示されて、Oracleが動いていることがわかる。
##参考